
By R.B. Quinn and Mindy Merrell of CheaterChef.Com.
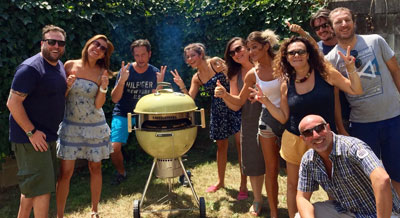
Hey KettlePeeps!
We are Chopped champion Mindy Merrell and the balding Eagle Scout, R.B. Quinn. We’re Nashville, TN, food writers and we are the food website www.CheaterChef.com.
We’re also pizza fanatics. When Mindy auditioned for a spot on the Food Network’s Chopped in early 2013, many months before she competed and won, Chopped producers asked her how she would spend the $10,000 prize if she became the Chopped champion. Mindy told them that it would be a dream come true to build a wood burning pizza oven in the backyard. “I’ve spent many frustrating years on pizza for the home cook and I’ve made some progress, but I think we still need to build the oven,” she said.
We’ve lived in Nashville for more than 20 years and have had plenty of southern biscuits, cornbread, and hot chicken, but with just about zero Italian heritage there’s no real pizza culture in this town. Until the recent influx of new restaurants with young chefs and now more than a few wood burning ovens, our city has been a virtual pizza desert. So, if you wanted good pizza you had to make it yourself.

We’ve fiddled with cooking techniques and dough recipes, all in hopes of turning out charred, puffy, chewy crusts. We’ve used the regular indoor oven and nearly every style of charcoal and gas grill. We even jerry-rigged a wood fired pizza “oven” with a campground fire ring and the steel cover from a metal fire pit to create some crucial “top-down” heat.

It’s easy to see why Mindy is such a pizza fanatic. As a kid she lived for a time in Naples, Italy, where she and her family took regular advantage of the absolute real-deal “Olde World” pizza made by sweaty Neapolitan guys in floury white tee shirts who maneuvered beautiful pies into tiled wood burning ovens with long-handled peels. Carmella, the family’s Neapolitan maid, picked up newspaper-wrapped dough from her local pizzeria to make her pies for family dinner.

Then, out of the blue KettlePizza came into our lives. Wandering the massive Hearth, Patio & Barbecue Expo at Nashville’s Music City Center in March we turned a corner and walked smack into Al Contarino and George Peters and their KettlePizza booth. An hour later and we we’re all still talking pizza, dough, mozzarella, and generally swapping assorted epic moments in pizza-making. They are great guys and it was clear right away how much they love great pizza and believe in KettlePizza.
Turns out we didn’t need to construct that wood oven after all. We just needed KettlePizza and that beautiful Baking Steel high performance lid that comes with the KettlePizza Serious Eats Special Edition kit. What a lucky day that was.
We’re making the best pies of our lives, no kidding.

Al and George invited us to contribute to The KettlePizza Blog so….let’s make some KettlePizza pies in 5 easy steps.
Step 1: Arrange the Charcoal.
Fill a charcoal chimney starter with briquettes and arrange them in a “C” shape around the backside of the grill, banking them between the charcoal grate and the curved wall of the grill. Then, half-fill the chimney with additional briquettes and spread them out over the “C.”
Step 2: Light the Charcoal.

Place 3 or 4 Weber FireStarter Lighter Cubes on top of the briquettes and light them all. We love these charcoal starter cubes. They are so easy to use, especially when lighting a pile of briquettes. The briquettes should be white and ashed-over in 35 to 40 minutes.
Step 3: Set in Some Wood Chunks.

Add a few hardwood chunks on top of the charcoal on both sides before placing the Baking Steel on top of KettlePizza. Use dry seasoned hardwood chunks (not chips) of oak, hickory, pecan, or fruitwood. In a few minutes the wood will catch and begin generating the flames needed to get that top steel hot.

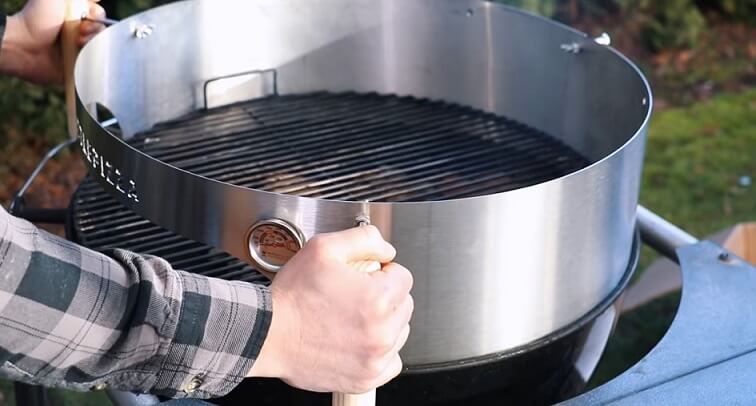
Once the coals are white and burning and your wood set where you want it place the KettlePizza insert (the ProGrate, the tombstone-shaped pizza stone, and the firebox) on top of the Weber. Add 3 or 4 hardwood chunks to the firebox, set the Baking Steel in the ring, and place the lid on. Now, let the stone and steel heat up.

Step 4: The Dough.
This is Mindy’s reliable “go-to” pizza dough recipe that consistently gives great results. It’s a solid basic dough for your recipe files.

These things matter when making great pizza dough:
- It sure is easy to mix up the dough if you have a stand mixer. If you really get into this KettlePizza thing, you’ll want to have one.
- Our recipe uses an equal blend of all-purpose and bread flours. Using both produces a dough that’s easy to handle AND has good structure. A little olive oil helps make it easy to handle, too.
- We use instant yeast simply because it’s easy and allows you to mix up all the dry ingredients together.
- Pizza dough should be quite soft with a high hydration rate (a higher ratio of water to flour than regular bread). This helps give the pie a nice puffy crust in the KettlePizza’s high heat. By weight, our recipe is 1.5 pounds of flour to 1 pound of water. That’s a nice 66% hydration rate.
- Don’t add the entire amount of flour called for in a recipe until you see after kneading that you need to add more. You don’t want a dough that’s too stiff. The amount of flour needed to make consistent dough depends on the humidity. Drier flour needs more liquid. You’ll get used to how an easy to handle dough feels after a few tries. If it just seems too sticky to handle with floured hands, add a little more flour.
- Dough portions that are about 6 to 7 ounces each will make a nice 8 to 9-inch pie that works great in the KettlePizza. A kitchen scale is handy for weighing the dough.
- This versatile dough allows you to use it the same day you make it and up to four days later. A slow rise in the refrigerator in individual pizza portions is both convenient and allows time for the flavor and gluten to develop. A two-day rise is ideal.
- Small rectangular four-cup containers usually labeled for soup and salad are super convenient for storing the dough in the refrigerator. Stick to one brand so you won’t be searching through a pile of lids that don’t fit. (We know this from experience.)
- We use the same dough for a regular crust and a thin crust pizza. For a pie with a nice puffed-edged crust, shape the discs by picking up the dough ball and gently pulling the edge with floured hands moving around the circle, allowing the weight of the dough to pull it down. You can also drape the dough over your fist periodically to allow the weight of the dough to hang and help form the circular shape. The goal is to have a nice disc of an even thickness. Be gentle, no need to toss it around. Properly risen dough will not fight you. For a thin crust pie, roll out the dough with a rolling pin on a floured board into a thin round. Prick the dough with a fork to keep it from bubbling up during baking.
- Make sure you have plenty of flour on the peel when you transfer the dough so it doesn’t stick. You can also use cornmeal or semolina flour for dusting.
- If your dough is very stiff and resists being stretched, sorry, you can’t have pizza right now. There’s no forcing it. You’ll have to let it rest in a warm place, covered with a wet towel or plastic wrap, to relax and soften up. You shouldn’t have this problem if you follow our recipe.
The Pizza Dough
2 ½ cups bread flour
2 ½ cups all-purpose flour
2 teaspoons instant yeast (or one packet that contains about 2 ¼ teaspoons)
2 ½ teaspoons fine-grained salt or 1 tablespoon coarse kosher salt
2 tablespoon olive oil
2 cups warm water
Making the dough in a stand mixer: Combine 4½ cups of the flours (leave out ½ cup bread or all-purpose flour), yeast, and salt in the mixing bowl of a stand mixer. Add the water and olive oil and blend with a spoon just to moisten all the ingredients. With a dough hook attachment, blend and knead the dough until all the flour is incorporated and a soft, smooth dough forms, about 5 minutes. It should be quite sticky. If it seems stiff enough and like you can handle the dough, stop here. If the dough seems very sticky, add the remaining ½ cup of flour (we usually add the full 5 cups) and blend well until smooth. It should be soft, but manageable with floured hands.
Making the dough in a food processor: Make the dough as with a stand mixer, using the plastic blade with your food processor to knead the dough.
Making the dough by hand: After combining the ingredients as above, gather the dough with floured hands into a ball and transfer it to a lightly floured board. Knead the dough, dusting with flour as needed, until it is smooth and elastic, about 8 minutes. It should be soft and pliable.
Using the dough in 24 hours or up to 4 days later: With floured hands, gather the dough into a ball and shape it into log about 12 inches long. Cut the dough into 6 even pieces. If you are using a scale, each piece of dough should weigh between 6 and 7 ounces. Shape them into balls dusting with flour as necessary. Place each ball into a plastic container with a tightfitting lid. Refrigerate the containers of dough for 18 to 24 hours and up to 4 days. Remove from the refrigerator when you start the KettlePizza fire.

Using the dough the same day: After kneading the dough, place it in a large mixing bowl sprayed with cooking spray. Lightly oil the top of the dough. Cover with a warm damp towel and allow to double in bulk. Timing will depend on the temperature of your room. In a warm room, it will take an hour or two, in a cool room you can leave the dough all day. After it has doubled in bulk, punch down the dough and divide it into 6 even balls. Place the balls on a floured rimmed baking sheet and cover with plastic wrap and a damp towel. When the dough balls have doubled in size, in about an hour or two, it’s time to make pizza.
Step 5: Assemble and Bake the Pie
Less is more when it comes to toppings. Go light on the tomato sauce, cheese, and toppings or the pie will be too heavy to handle on the peel and won’t cook properly. Yes, topping combinations are endless, we’re sticking to just the basics here.
The Tomato Sauce

You’ll get better, fresher flavor, with a simple combination of ingredients. Believe it or not, it’s enough for the 6-pie dough recipe.
2 cups canned crushed, diced or whole peeled tomatoes crushed with your hands
2 tablespoons olive oil (just eyeball a good dollop)
2 to 3 medium cloves garlic, finely minced or crushed in a garlic press
Pinch of salt
Combine all the ingredients in a bowl. Have a small ladle or big spoon ready to coat the pies.
The Cheese

Packages of whole milk or fresh mozzarella that you cut yourself are the way to go. Just chunk the cheese up roughly into slices with a knife. Pre-shredded mozzarella just doesn’t pack the same “mootz” flavor.
Making the Pie
When KettlePizza is good and hot, spread the dough on the well-floured peel and spoon on the tomato sauce.


Again, less is more when it comes to sauce, cheese, and toppings. Err on the light side. Too much stuff on the pie will make it hard to handle and difficult to bake. Dot with pieces of cheese and other toppings, but not too much.

Jiggle the peel to make sure the pizza will slide into the oven easily. If it seems stuck, pick up an edge and sprinkle some four under there. Keep doing this until it glides easily.
If you have an inexpensive Infrared thermometer, check your stone and steel heat now. The KettlePizza Zone is 600F or more.

Now you’re ready to make KettlePizza pies.

Look at your watch and slide the pie from the floured peel onto the middle of the stone. Leave it alone for about a minute to let the dough begin to set. Using the metal peel lift and spin the pie around on the stone about 180°. The side of the pie closest to the firebox will cook faster so once the dough has firmed up enough to be movable without tearing, keep your pie rotating for even cooking and crust browning.

At about 3½ to 4 minutes (depending entirely on your oven temperature) your pizza should be done. The dough should be fully cooked and the top and bottom should be developing scattered charred leopard spots. The toppings will be sizzling. Scoot your peel under the pie and with confidence slide it from the oven and onto a cutting board. Slice away once you can safely see through your tears of absolute joy.

 Refueling your KP:
Our tests with Kingsford brand briquettes have shown that KettlePizza will maintain pizza range temperature for about 50 minutes. Maintain a consistent wood fire burn to keep that steel hot. When the flames die back and no longer roll across the underside of the steel, add a couple more chunks.
Or, remove the kettle lid, and with heavy duty gloves spin the steel so one of the openings lines up with the firebox. Using long metal tongs give the burned wood a stir and add fresh chunks to the box. Spin the steel back in place and replace the kettle lid.
When the side thermometer starts to head south of 600°F, it’s time to think about adding charcoal. Add some lump hardwood charcoal (not unburned briquettes). Use the handle holes in the Baking Steel as access points to your charcoal bed.
To learn more about Chopped Champion Mindy Merrell, R.B. Quinn and CheaterChef.com, visit them HERE.